- Published on
Virtual machine from scratch
- Authors

- Name
- Nathan Lu
I. Introduction
Have you ever wondered how programming languages manage to run seamlessly on different devices without a hitch? The answer lies in the ingenious concept of Virtual Machines (VMs). In this blog post, we'll embark on a journey to demystify VMs, exploring their significance, architecture, and even building a simple VM from scratch.
What is a Virtual Machine, and Why Does It Matter?
At its core, a Virtual Machine is a software-based simulation of a physical computer. Unlike a tangible device, it operates at a higher level, manipulating instructions rather than tangible hardware.
The key reason behind the prevalence of VMs is their ability to enhance portability. By having programming languages run on a virtual machine, such as Java on the JVM or C# on the CLR, the compiled code becomes platform-independent. This bytecode can execute on any environment equipped with the corresponding virtual machine, ensuring consistency across diverse platforms.
However, it does come with a downside. A noteable flaw of VMs is their performance compared to languages that compile directly to machine code, like C or C++. The additional layer introduces overhead, causing a slight lag in execution speed.

How the Bytecode, Execution Engine, and Stack work together
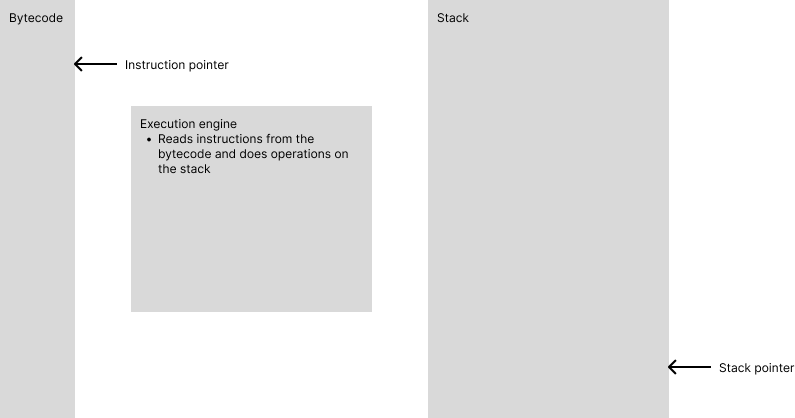
To comprehend the inner workings of a VM, let's delve into the ballet of bytecode, execution engine, and stack.
Bytecode: This is a series of commands, resembling a script, that dictates operations to be performed by the VM. For instance, pushing values onto the stack or performing basic arithmetic.
Execution Engine: Think of this as the maestro conducting the bytecode orchestra. It reads each instruction, executes the corresponding operation, and moves on to the next one.
Stack: Imagine a stack of plates – each operation adds a plate, and each result removes one. This is the essence of a stack in a VM. Rules are simple: after every operation, a value is popped off the stack, ensuring that the only value left is the final result.
Now, in the spirit of hands-on learning, let's embark on a journey to construct a basic VM. We'll start by enabling it to push values onto the stack and perform basic arithmetic. As we progress, we'll layer on more advanced features such as if statements, for loops, and function calls.
II. Designing the stack
1. Understanding the Stack
In the realm of virtual machines, the stack plays a crucial role in managing data and controlling program flow. A stack follows the Last-In-First-Out (LIFO) principle, meaning the last item added is the first one to be removed.
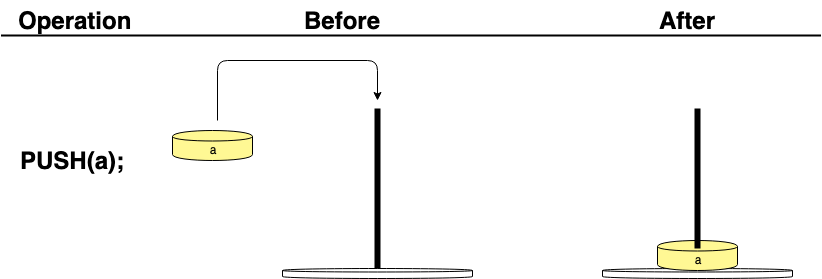
One way to think of the value stack is like a wooden peg on which you can stack cylinders. You would only add or remove one item at a time.
For example, if you are trying to push the value 10 onto the value stack, the action would have the following effect:

In the next operation, to fetch that value, you would use the POP() function to take the top value from the stack:

If you were to add 2 values to the stack. They would end up in the order in which they were added, so a would be pushed to the second position in the stack:

If you were to fetch the top value in the stack, you would get a pointer to b because it is at the top:

2. Implementing the Stack
Let's start by defining the structure of a stack. In a simple implementation, a stack consists of an array to hold data and a stack pointer that points to the top-most value
#define STACK_LIMIT 512

// valuestack is an implementation of stack data structure.
// Used to hold values.
struct valuestack {
  struct vm_value data[STACK_LIMIT];
	struct vm_value* sp;    // Pointer to the top most value in the stack
}

void initialize(struct Stack *stack) {
  stack->sp = NULL;
}
2.1 Push operation
The push operation involves adding an item to the top of the stack. In our implementation, it's a matter of appending the item to the list:
void push(struct Stack *stack, struct vm_value value) {
  if(is_full(stack)) {
    printf("Stack overflow");
    exit(EXIT_FAILURE);
  } else {
    if(is_empty(stack)) {
      // set the sp to the first item
      stack->sp = &stack->data[0];
    } else {
      // move stack pointer up
      stack->sp++;
    }

    // dereference and set value
    *stack->sp = value;
  }
}
2.2 Pop operation
Popping an item off the stack entails removing the topmost item. We use the pop() method, checking for emptiness before attempting to pop:
struct vm_value pop(struct Stack *stack) {
  if(is_empty(stack)) {
    printf("Stack underflow");
    exit(EXIT_FAILURE);
  } else {
    struct vm_value popped_value = *stack->sp;

    // move stack pointer down
    stack->sp--;

    // check if stack is empty
    if(stack->sp < &stack->data[0]) {
      stack->sp = NULL;
    }

    return popped_value;
  }
}
Now that we've laid the foundation with a stack implementation, let's turn our attention to the heart of our virtual machine: bytecode. As we venture into bytecode generation, we'll explore how to represent high-level operations in a concise and efficient form that our virtual machine can interpret.
III. Designing the bytecode
1. Understanding the bytecode
Bytecode serves as the intermediary language between the high-level code written by the programmer and the low-level operations executed by the virtual machine. It consists of a set of instructions, each representing a specific operation or action. Bytecode allows for portability and abstraction, enabling the virtual machine to execute programs regardless of the underlying architecture.
The process of bytecode generation involves translating high-level operations from the source code into corresponding bytecode instructions. This process is done by the compiler and will be covered in future articles.
1.1 Bytecode instruction set
Essentially, all the bytecode is is just an array of instructions for the execution engine to interpret and apply transformation to the stack. For example, this instruction set
0x01: PUSH_CONSTANT
0x02: ADD
0x03: SUBTRACT
0x04: MULTIPLY
0x05: DIVIDE
0x06: POP
0x07: JUMP_IF_TRUE
0x08: JUMP
In this example, PUSH_CONSTANT pushes a constant value onto the stack, ADD performs addition on the top two stack values, and so on.
1.2. Bytecode generation
The compiler takes generates an array of instructions from this instruction set. It might look something like this:
For instance, a high-level statement like a = b + c might translate into a sequence of bytecode instructions, including PUSH_VARIABLE for b, PUSH_VARIABLE for c, and ADD to perform the addition.
// This is a bytecode for a + b;
uint8_t bytecode[] = {
	OP_CONST,
  0, // <-- 0 is an index
	OP_CONST,
  1, // <-- 1 is an index referring to an array
	OP_ADD,
  OP_HALT
}
Notice how there are integers following OP_CONST instruction. Because the compiler might have generated the following bytecode from the code: 32 + 48, the integers in the bytecode corresponds to the constants 32 and 48. In a typical programming language (such as python), the compiler generates a list of constants along with the bytecode, in which the execution engine would resolve the constants from the indices provided for in the bytecode. The main takeaway here is the virtual machine receives bytecode and constants array as input.
2. Implementing our bytecode
Lets start with a basic instruction set
#define OP_HALT 0x0
#define OP_CONST 0x1
#define OP_ADD 0x2
Normally, the compiler would generate the bytecode for us. For now, let’s hardcode an example bytecode.
// This is a bytecode for a + b;
uint8_t bytecode[] = {
	OP_CONST 0, // <-- 0 is an index
	OP_CONST 1, // <-- 1 is an index referring to an array
	OP_ADD,
  OP_HALT
}
And as mentioned prior, let’s also include the constants array.
#define MAX_CONSTANTS 10
struct vm_value constants[MAX_CONSTANTS] = {NUMBER(2.0), NUMBER(3.0)};
Now that we have covered the purpose of the bytecode array, in the next section, we'll delve deeper into the intricacies of the execution loop, exploring how the virtual machine interprets and executes the generated bytecode.
IV. Designing the execution engine
1. Understanding the execution engine
now that we have a bytecode array, and the stack, we need something in between that interprets the instructions and applies transformations onto the stack. that is what the execution engine is
It is responsible for the interpretation and execution of bytecode instructions. It scans through the bytecode sequentially byte by byte, carrying out operations on the stack.
For instance, when encountering a "PUSH_CONSTANT" instruction, the engine efficiently adds the specified constant value to the stack. Similarly, an "ADD" instruction prompts the engine to perform addition by manipulating the top two elements on the stack.
2. Implementing the execution engine
struct exec_engine {
  uint8_t *ip;
  uint8_t *bytecode;
  struct vm_value *constants;
  struct valuestack *stack;
}


void initialize_exec_engine(struct exec_engine* ee, uint8_t* bytecode, struct vm_value* constants) {
  // init our stack
  struct valuestack* stack = malloc(sizeof(struct valuestack));
  // @todo check if malloc fails
  initialize(stack);

  ee->stack = &stack;
  ee->bytecode = bytecode;
  // pointer the instruction pointer to the first bytecode
  ee->ip = &ee->bytecode[0];
  ee->constants = constants;
}
Let's now build the main loop. In python, the execution engine code (found in ceval.c) is just a giant switch statement that runs different functions depending on the received instruction. We will do that for us too.
// Main loop, takes in bytecode and executes
void exec_engine_run(struct exec_engine* ee) {
	for(;;) {
    switch(read_byte()) {
       case OP_CONST:
         execute_op_const(ee);
         break;
       case OP_ADD:
         execute_op_add(ee);
         break;
       case OP_HALT:
         return;
       default:
         printf("Unknown bytecode");
         exit(EXIT_FAILURE);
    }
  }

  // Free the allocated memory for the stack
  free(ee->stack);
	return;
}
Let's add a function to fetch the next instruction from our bytecode.
// This function will increment the instruction pointer,
// reading the next byte in our bytecode
uint8_t read_byte(struct exec_engine* ee) {
  uint8_t value = *ee->ip;
  ee->ip++;
  return value;
}
Let's define the logic for executing our instructions
void execute_op_const(struct exec_engine* ee) {
  // If we read the byte as OP_CONST, the
  // next byte must be the index
  uint8_t array_index = read_byte(ee);
  struct vm_value constant = ee->constants[array_index];
  push(ee->stack, ee->constant);
}
void execute_op_add(struct exec_engine* ee) {
  // Because a stack is First in Last out (FILO),
  // the top most value is the most recent added.
  // The order is revelant for subtraction.
  //
  // a + b;
  struct vm_value value_b = pop(ee->stack);
  struct vm_value value_a = pop(ee->stack);

  // @todo check if vm_value type is number
  double double_a = value_a->number;
  double double_b = value_b->number;
  struct vm_value result = NUMBER(double_a+double_b);
}
Now, let's bring everything in together.
int main() {
  uint8_t bytecode[] = {
		OP_CONST 0, // <-- 0 is an index
		OP_CONST 1, // <-- 1 is an index referring to an array
		OP_ADD,
	}
	struct vm_value constants[MAX_CONSTANTS] = {NUMBER(2.0), NUMBER(3.0)};

	struct exec_engine ee;
  initialize_exec_engine(&ee);
  exec_engine_run(&ee);

	return 0;
}
Now, you should have a working VM that takes in bytecode and performs operations on the stack. As a challenge, go ahead and implement subtraction, multiplication, and division operations yourself. Next, we will see how the bytecode and constants are generated by the compiler, and how we can build one ourselves.